In 2024 I started thinking about making a simple PCB as a Christmas present for friends and family. Why? I just wanted to learn how to make printed circuit boards (PCB), and I tried but never seriously.
EDA software looks so complicated…
Those who know me know that I don’t really like holidays, especially Christmas. I’m like a modern Grinch, we both love green and hate capitalism.
…
one year later, many things have happened.
A few weeks ago, a friend of mine said to me, “Hey, look, it’s really easy to make PCBs with easyEDA” and he explained how to use it. I had even forgotten about my Christmas project in the meantime…
I started digging around when I realized that finally, as my first project, I could make something I had been thinking about last year.
Pause! I do cloud infra as my primary job, but I’m also very into electronics stuff and DIY. My lab is like a cemetery for ESP32 and other abandoned projects. More on them maybe in the next posts.
After figuring out how to place components around and access the infinite catalog of SMD components, etc., within EasyEDA, I thought… why not make this present intelligent too?
So the basic idea was clear at this point. A battery-powered Christmas tree-shaped PCB, addressable LEDs, and an ESP32 to synchronize multiple trees in the vicinity. Cool, isn’t it?
At some point I also was thinking to add a microphone for syncing LEDs with music volume, but.. I decided to implement this feature maybe later.
I immediately discarded the idea of using 18650 battery or other LiPos because I’m too newbie and I don’t feel confident in mastering a charging circuit. So I decided to go for 2xAAA batteries.
Choosing which Espressif SOC was pretty easy, I decided to go for an ESP32-S3-WROOM with built-in antenna. Now I realize that it might be a bit overkill for a project like this. I’ll probably change it if there are any further revisions.
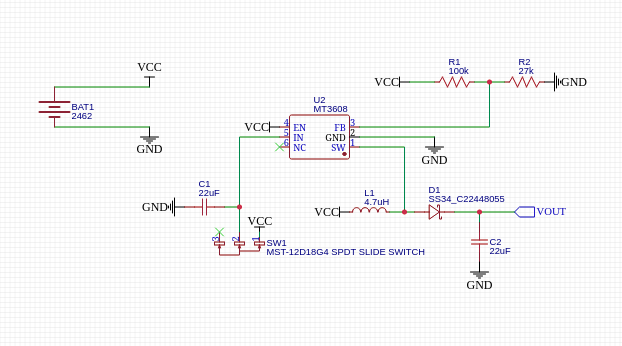 Schematic to power the PCB from two AAA batteries, with voltage regulator
I started designing the schematics, starting from how to power the whole thing. Quite easy. Then, I made the part for the ESP32, easy too, I play with these things every single day, almost… Finally I’ve made the LED part, also easy and very repetitive.
Now comes the fun part, designing the PCB, the thing that will become real. At the beginning I struggled a bit trying to understand how I can import an SVG and use it as an outline for my prototype. To be clear, I spent most of the time learning how layers work, it was not very intuitive for me.
It was very funny to arrange the objects inside the board and realizing how many times I’ve seen stuff like that done by other people trying to figure out how it’s been realized. And now I’m doing the same thing.
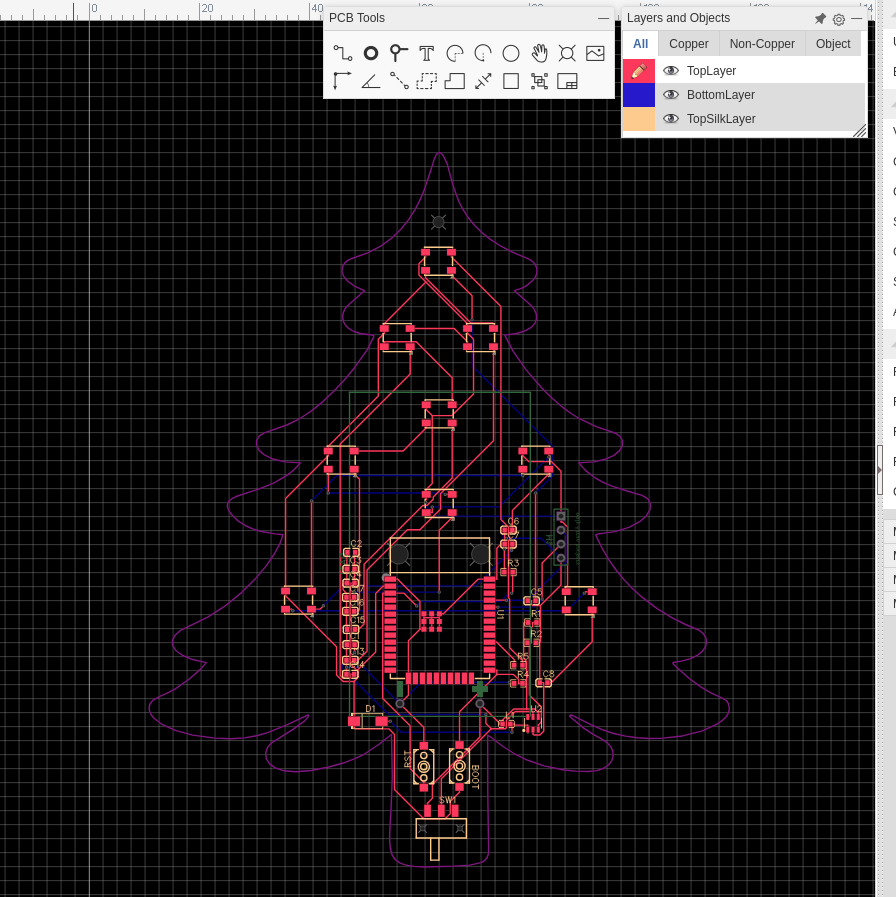 Christmas tree-shaped PCB
Wow, very cool - my first PCB begins to take shape. As I looked at it, I remembered a friend of mine who had decorated our house where we lived, and somewhere there was this sign that said “Merry Fucking Xmas” It’s perfect. It must be written somewhere on the PCB. It took me a while to figure out how the hell to add an inscription to the board, but I managed it.
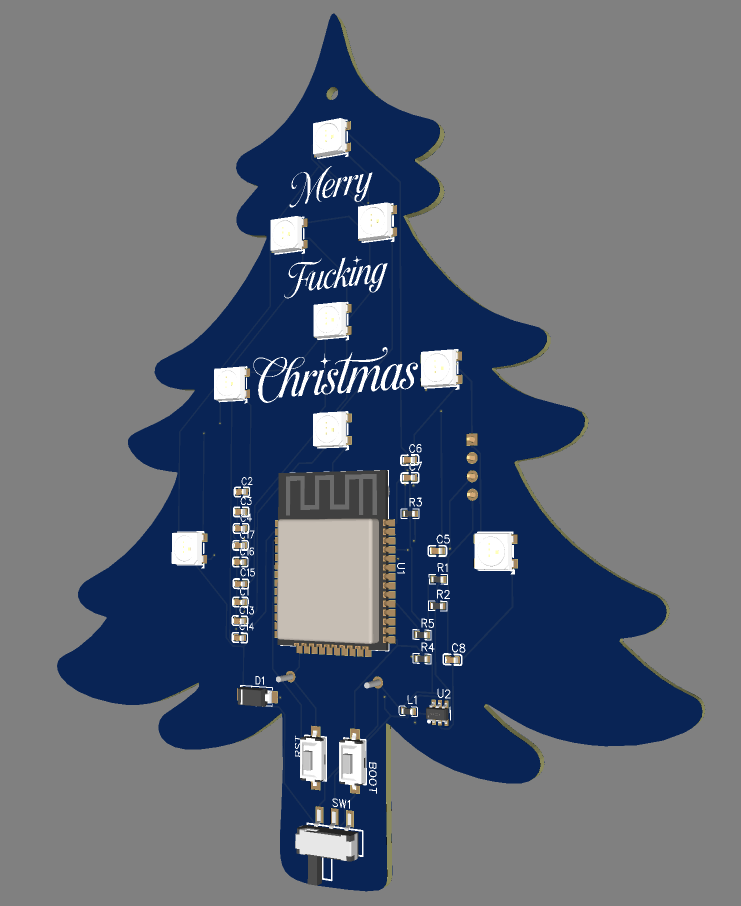 3D render of the board on EasyEDA.
Not bad at all. I was impressed by how easy it was to do.
After struggling with the BOM and the other stuff you have to do to order the prototypes, after checking the schematics hundreds of times etc., after thinking a lot about spending my money on this prototype and MAYBE it wouldn’t work… In the end I decided to make this investment, so I spent like 100 euro on JLCPCB to produce 5 pieces. Yeah, just five. I decided to pay for the assembly of the SMD components since I’ve never done anything like that nor do I have the right tools to do that.
Part 2 when the boards will arrive.